Cakewalk // Documentation // SONAR X2 // Track Inspector controls
Table of Contents Previous Next Index

InspectorsTrack Inspector overview ► Track Inspector controls

Audio track
MIDI track
Docking Options
The Docking Options menu lets you dock/undock/float/collapse the Inspector pane.
The change in velocity (volume) that will be applied to notes in the track on playback; ranges from –127 to +127.
ProChannel (Producer only)
ProChannel is an extended channel strip that provides high-quality Compressor, Equalizer, and Tube saturation processing for each channel. See ProChannel (Producer only).
Activates a send module, which sends a copy of the track signal to a bus.
Send Pre/Post switch
Pre (pre-fader) means that the Send signal goes to the bus prior to the track’s volume fader; post means the Send signal goes to the bus after the volume fader.
Send destination
A switch that determines whether a track’s signal enters an effect or chain of effects as mono or stereo, regardless of the nature of the track.
Read Automation
Write Automation
Arm for recording
Waveform Preview
The stereo distribution of the output, ranging from 100% left (hard left) to 100% right (hard right); a value of “C” indicates sound that is centered left-to-right. On stereo tracks, pan acts as balance.
The current volume level for the track, ranging from -INF (silent) to +6 dB (maximum volume). The recording and playback levels are displayed in the Playback and Record meters.
The recording and playback levels are displayed in the Playback and Record meters. For MIDI tracks, the meter shows MIDI activity and velocity.
Track icons allow you to quickly identify a track’s contents by instrument. You can assign a new track icon, create your own track icons, and save an icon as part of a track template.
A name that you assign the track for easy reference. Note that if you do not assign a name to a track, the default name is the track number. This track number will change if you change the order of your tracks. You can click the Track Name control to select any available track, bus or main to display in the Track Inspector.
Main out faders can be linked using the Link button 
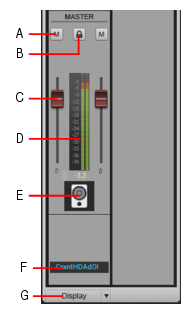
. This allows you to adjust both the left and right channel at the same time.
The Bank Select Method used by your sound module to switch back and forth between banks of sounds.
Patch Browser
Opens the Patch Browser dialog dialog box, which lets you search for patches by name.
The number of half steps by which the notes in the track are transposed on playback (e.g., 12 to transpose up one octave)
The Arpeggiator lets you play intricate patterns of notes that would otherwise be extremely difficult or impossible to play manually and at speeds and octave ranges that exist beyond the physical limitations of the player or keyboard range. See Arpeggiator section.
Input quantize
When Snap to Scale is enabled, any notes that you draw or move in the Piano Roll view stay within the selected scale. See Snap to Scale section.
The Display menu lets you show/hide modules in the Track Inspector.
Module Options
The Module Options menu lets you configure settings for various modules.
A. Input gain B. ProChannel (Producer only) C. Effects bin D. Sends E. Mute, Solo, Arm, Input Echo, Phase Invert, Stereo Interleave, Read Automation, Write Automation F. Pan G. Volume H. Meter I. Track icon J. Input and output K. Track name and number L. Display menu
A. Input gain and pan B. ProChannel (Producer only) C. Effects bin D. Sends E. Mute, Solo, Waveform preview, Read Automation, Write Automation F. Pan G. Volume H. Meter I. Bus Icon J. Output K. Bus name L. Display menu
When the current track is a MIDI track, the left strip shows mix controls and the right strip shows Snap to Scale, Input Quantize, Arpeggiator and other advanced MIDI settings. Instrument tracks can show either audio or MIDI controls in the right strip, depending on whether the Audio or MIDI tab is selected.
A. Velocity trim B. Effects bin C. Channel/Bank/Patch Quantize D. Mute, Solo, Arm, Input Echo, Read Automation, Write Automation E. Pan F. Volume G. Meter H. Track icon and number I. Input and output J. Track name K. Display menu L. Chorus and Reverb M. Snap to Scale N. Input Quantize O. Arpeggiator P. MIDI offset controls (Key+ and Time+) Q. Open Patch Browser R. Bank Select Method S. Audio and MIDI tabs (Instrument tracks only)
A. Audio output B. MIDI controls
list-image
Chorus. Adds MIDI chorus effect to the track.
list-image
Reverb. Adds MIDI reverb effect to the track.
list-image
Key+. The number of half steps by which the notes in the track are transposed on playback (e.g., 12 to transpose up one octave)
list-image
Time+. The number of Ticks that the track’s playback timing is offset from the other tracks.
list-image
Patch Browser. Opens the Patch Browser dialog dialog box, which lets you search for patches by name.
list-image
Bank Select Method. Your synthesizer uses one of four bank select methods to switch back and forth between banks of sounds. To find the method used for your instrument, check the instrument’s User’s Guide or the manufacturer’s web site. The four methods are as follows:
list-image
Normal. Use for instruments that respond to Controller 0 or Controller 32 bank select messages.
list-image
Controller 0 only. Use for instruments that only respond to Controller 0 bank select messages.
list-image
Controller 32 only. Use for instruments that only respond to Controller 32 bank select messages.
list-image
Patch 100...127. Use for instruments that let you change banks by sending patch changes between 100 and 127.
list-image
Snap to Scale On/Off. Enables/disables Snap to Scale on the selected track.
list-image
Scale. Displays current scale for Snap to Scale feature. The drop-down menu contains the following options:
list-image
<scale categories>. The pre-installed scales are organized into categories such as Diatonic, Pentatonic, Exotic, etc. Point to the desired category and select a scale from the submenu.
list-image
Custom User Scales. This submenu lists all custom scales you have created.
list-image
Scale Manager. Select Scale Manager to create new scales or edit existing scales. See To create a scale and To edit or delete a scale.
list-image
Root Note. Use this field to specify the root note of the selected scale.
list-image
Settings. Use this field to specify how you want SONAR to handle non-scale notes in the Piano Roll view when Snap to Scale is enabled.
list-image
Next, Higher Note. SONAR moves any non-scale note that you move to the next higher note in the selected scale.
list-image
Previous, Lower Note. SONAR moves any non-scale note that you move to the previous, lower note in the selected scale.
list-image
Nearest Note. SONAR moves any non-scale note that you move to the note that is closest in pitch in the selected scale.
list-image
Input Quantize On/Off. Enables/disables Input Quantize on the selected track.
list-image
Preset. Save or select settings that you use often in the drop-down menu. To save a new group of settings, click the Preset list and choose Quantize Settings to open the Input Quantize dialog box, then type a name in the Preset field and click the Save button. To delete a group, select it and click the Delete button. The Input Quantize dialog box contains the following settings:
list-image
Resolution. Set the note resolution in either standard note duration or tick value. The resolution determines the size note or time value that you want your MIDI data to conform to.
list-image
MIDI Event Start Times. Select this option to quantize MIDI event start times.
list-image
Note Durations. Select this option to quantize Note Event durations to the size of the Resolution value.
list-image
Only Quantize Notes. If selected, SONAR will not modify other events, such as controllers.
list-image
Strength. This value determines how closely SONAR moves the selected notes to the resolution value, or “grid”. See Strength.
list-image
Swing. Use this value to make groups of even eight notes (or whatever note you want to enter in the Resolution field) “swing”, instead of playing with exact eighth note rhythm. A value of 50 percent, or “50-50”, produces equal durations for both notes—no swing. A larger value makes the first note longer, and vice versa. See Swing.
list-image
Window. This value determines whether SONAR quantizes notes that are far from the quantization points, or leaves them alone. A value of 100 percent quantizes every note. See Window.
list-image
Randomize. This value randomizes the three previous fields to introduce a more human feel to the rhythm. The value you enter is the maximum amount of difference from the entered values that the randomize feature can add.
list-image
Arpeggiator On/Off. Enables/disables the Arpeggiator on the selected track. This control can be assigned to MIDI remote control and modified in real-time during project playback.
list-image
Preset. You can create and edit Arpeggiator presets; all user parameters are stored in the preset. Arpeggiator settings are included in track templates.
list-image
Rate. Adjusts the relative speed of the Arpeggiator sequence by changing all the note durations by a factor of the current tempo. This control can be assigned to MIDI remote control and modified in real-time during project playback.
list-image
Octave Range. Sets the number of octaves through which the arpeggio will play. A value of 1 means that a held chord will only arpeggiate the notes that are being held within the octave from which the notes are being transmitted. A value of 2 means a held chord will arpeggiate for two octaves. The held chord always represents the bass octave, meaning that the other octaves sound in a higher register.
list-image
Latch. Latch keeps the arpeggio playing after you let go of the keys.
list-image
Swing. Sets the amount of swing applied to the selected pattern. You can make a pattern of 8th, 16th, or 32nd notes play back as swing notes instead of straight notes. The amount of swing ranges from 0 (no swing) to 100% (maximum swing).
list-image
Velocity. An offset control that scales the arpeggiated note’s velocity to a percentage of the original note velocity.
list-image
Duration. Controls whether the notes in the pattern are held to their full value, or are held for shorter or longer durations.
list-image
Pitch. A transposition control in half-steps, up or down a maximum of 2 octaves.
Flam. If a pattern contains flams, this menu controls how big a difference there is between the attack time of the flam and the note it is attached to.
list-image
Mix. When 0, simultaneously held notes arpeggiate as single notes. At 50%, simultaneously held notes are heard as a chord in addition to the usual arpeggiated notes, both at equal levels. At 100%, only the held chord is audible.
Control: Knob (0 – 100%); this control can be assigned to MIDI remote control and modified in real-time during project playback.Channel. MIDI input and output menu—the Arpeggiator only affects input data that’s on the MIDI channels listed on this menu. The Arpeggiator always obeys the track’s assigned output channel, plus any additional channels specified in the Arpeggiator’s Ch menu.
list-image
Shape. Choose a shape that specifies the direction in which currently held notes are to be sequenced. The following shapes are available:
A. Mute B. Link channels C. Volume D. Meter E. Icon F. Mains name G. Display menu
Click the Display control at the bottom of the Track Inspector and select the modules you want to show/hide.
list-image
Input Gain. Show/hide Input Trim/Gain/Pan controls.
list-image
ProChannel (Producer only). Show/hide ProChannel controls, which includes Equalizer, Compressor and Tube Saturation.
list-image
FX Bin. Show/hide effect bins.
list-image
Sends/Bank/Patch. Show/hide Send controls for audio tracks and buses, or Bank/Patch/Channel controls for MIDI tracks and Instrument tracks.
list-image
MSR. Show/hide Mute, Solo, Arm for Recording, Input Echo, Phase Invert, Mono/Stereo, Read Automation, Write Automation and Wavefrom Preview controls.
list-image
Pan Control. Show/hide Pan controls.
list-image
Volume. Show/hide Volume controls and meters (and Link controls for mains).
list-image
Icon. Show/hide track icons.
list-image
In/Out. Show/hide Input and Output controls
Figure 178. Use the Display menu to configure modules in the Track Inspector.

Copyright © 2024 Cakewalk, Inc. All rights reserved
Sitemap | Privacy Policy | Legal